QR Clamps---------------
QR Clamps---------------
 |
C-12 Quick Release Clamp - Installation Instructions

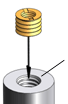
3/8” Threaded Hole |
Step 1: Screw the Brass Bushing into the threaded hole in the stem. A penny or similar sized coin can be used as an installation tool. Screw the bushing in fully. It should be flush with the top surface of the stem or slightly recessed (if it is proud, it should stick out no more than the thickness of 2 business cards (.025")). |
 |
|
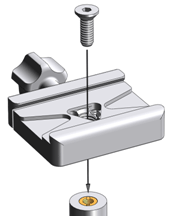
Step 2: Fasten the C-12 to the stem with the 1/4” screw provided.Use the enclosed 5/32 hex key to tighten the screw very snugly (lock down the ball head and give it some muscle). . |
 |
|
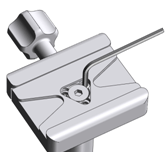
Step 3: Tighten the 3 set screws, using the enclosed 2.5mm hex key. Lightly tighten all three, then go back and firmly tighten each one. |
 |
|
Set Screws & Small diameter stems: If your ball head has a small diameter stem, the set screws may not fully engage the surface of the stem. However, because there are three set screws, we have found that they create a rigid, twist-free connection even in situations where the set screws are only partially contacting the stem of the ball head. If you are not comfortable with the amount of contact between the set screws and the stem of your head, you can use an adhesive such as epoxy or “Loctite” to keep the clamp from twisting or coming loose. |
|
© Copyright 2020 - Wimberley, Inc. - All Rights Reserved
Made in USA and Assembled in Charlottesville, VA |